Secrets and intrigue need not be limited to flashy spy movies and novels such as the James Bond or the Jason Bourne franchises; one can hide information inside a small, simple image by using binary numbers.
Binary numbers consist of 0's and 1's, and they are part of a number system known as the binary number system or base-2 numbers. The number system we commonly use is known as the decimal number system or base-10 numbers.
I'm sure anyone reading this blog is familiar with number systems, since they're such a fundamental part of computing. They're also a fundamental component of the process of hiding information inside images.
Of course, I'm not claiming that I'm an expert on this subject; far from it, actually. Calling me a rookie in this field would be an injustice to actual rookies in existence, but I can say that I know the basic principles behind a single, simple algorithm.
Exploring this algorithm might perhaps provide you with the motivation to further pursue the complexities of this field (as I intend to do myself). And should we choose to do so, our knowledge and experience with binary would increase as a consequence as well, which will come in handy in being creative with programming languages.
But before diving into this exciting field, I should first begin by crediting the original source that inspired the creation of this blog post:
The algorithm we're going to discuss is based on the excellent online course offered by Goldsmiths, University of London at the online learning platform of Coursera. The course is called "Mathematics for Computer Science" and you can find its link here:
https://www.coursera.org/learn/mathematics-for-computer-science/
Step 1: Understanding Pixels and Images
Before embarking on the valiant quest of coding images with secret messages, we first have to understand the nature of how images are represented in computers. And it all starts with "pixels".
Pixels can be thought of as the smallest unit that constitutes an image. It is, in essence, a small colored square that is combined with other colored squares (i.e. other pixels) in order to complete an image.
Think of each pixel as a piece of a large jigsaw puzzle, and arranging them together produces an image. Of course, if pixels are just randomly assembled without any forethought or planning, then the end result is more than likely to be a jumbled, visual mess (otherwise known as "modern art").
Tasteless jokes and attacks on artistic expressions aside, the important thing about pixels is that they're represented by numbers. These numbers can be in the form of RGB codes (Red, Green, Blue), hex codes (hexadecimal codes), HSL (Hue, Saturation, Lightness), or some other code.
Take RGB color code as an example. In this color scheme, we combine the colors red, green, and blue to form all the different shades of colors we can see in our devices.
Each individual color value of red, green, or blue ranges from 0 to 255. For example, for printing the purest version of the color red on our screens, we use the RGB value of rgb(255, 0, 0).
Here,
- Value of Red = 255 (i.e. the maximum possible contribution of red to the pixel)
- Value of Green = 0 (i.e. the minimum possible contribution of green to the pixel)
- Value of Blue = 0 (i.e. the minimum possible contribution of blue to the pixel)
Similarly, for printing the purest version of green, we use the code rgb(0, 255, 0), and for the purest blue, we use rgb(0, 0, 255).
To print black, we set all the values of red, green, and blue to 0 (since black is actually an absence of other colors).
To print white, we set all the values of RGB to 255 (since white is the combination of all colors).
Intermediate values for RGB are used to produce colors of almost all hues that our eyes can see.
As for hex codes, they can be derived by simply converting the RGB codes into the hexadecimal number system.
The main takeaway here is that colors are represented by numbers. These numbers - like all numbers we know - can be converted to binary. And hiding a message inside images often involves manipulating the least significant digits of these binary numbers.
Now let us proceed to the next step: creating a simple image with 4x4 (16 pixels) and modifying it to hide random numbers in it.
Step 2a: Hiding Random Numbers Inside an Image
Let us consider a very simple, rudimentary image below.
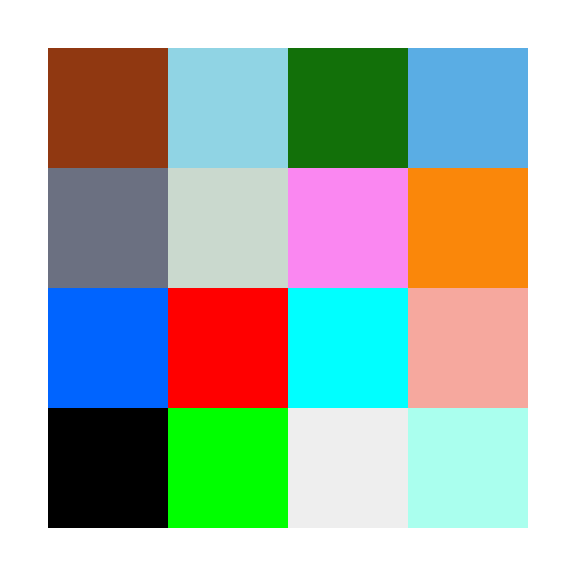
This image consists of 16 pixels of different colors and hues and is arranged in a 4x4 format i.e. it has 4 rows and 4 columns.
We will hide numbers that can only be represented by 3 binary digits i.e. the numbers 0-7.
[Note: Binary digits are more popularly known as "bits"]
Why use only 3 bits, you might ask? Because RGB codes only allow for 3 distinct numbers (that of red, green, and blue). And we hide each binary bit of our hidden number in the least significant bit of each RGB value.
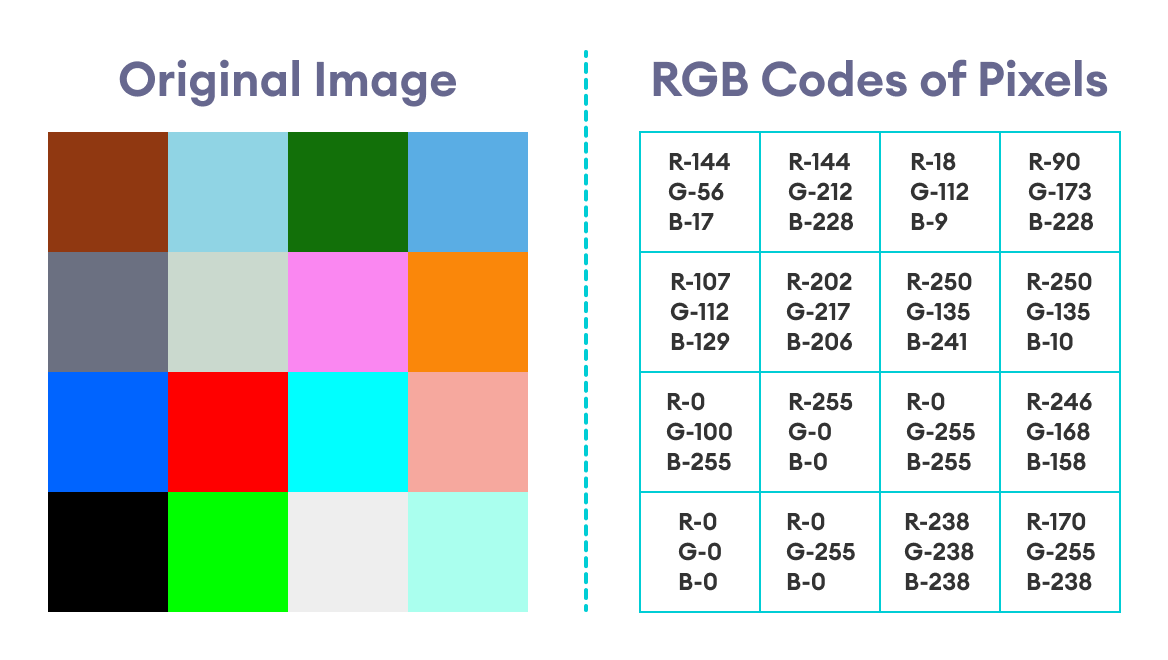
Let us take an example for more clarification. Suppose we want to hide the number "6" in the first pixel of the image. The RGB code for the first pixel is rgb(144, 56, 17).
We first convert the RGB values into binary. So,
| Color | Value in Decimal System | Value in 8-bit Binary System |
| Red | 144 | 1001 0000 |
| Green | 56 | 0011 1000 |
| Blue | 17 | 0001 0001 |
The binary equivalent of 6 (the number we want to hide) is 110. We hide the left-most bit of 110 (i.e. 1) in the right-most bit of the binary value for red.
So,
Red = 1001 0001 (originally 1001 0000) = 145
Similarly, the bit in the middle (i.e. another 1) is hidden in the right-most bit of the binary value for green.
i.e. Green = 0011 1001 (originally 0011 1000) = 57
And finally, the right-most bit of 110 (i.e. 0) is hidden in the right-most bit of the binary value for blue
i.e. Blue = 0001 0000 (originally 0001 0001) = 16
This results in our coded pixel to be rgb(145, 57, 16).
Let us compare the two pixels: the original with no coded number, and the modified one coded with the number "6".
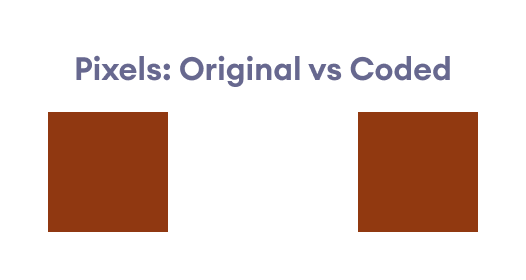
As we can see, the two pixels are extremely similar to each other, and the casual eye is highly unlikely to discern a difference between the two.
We repeat the same process with the next 15 pixels, and the end result is a modified image that looks nearly identical to the casual eye.
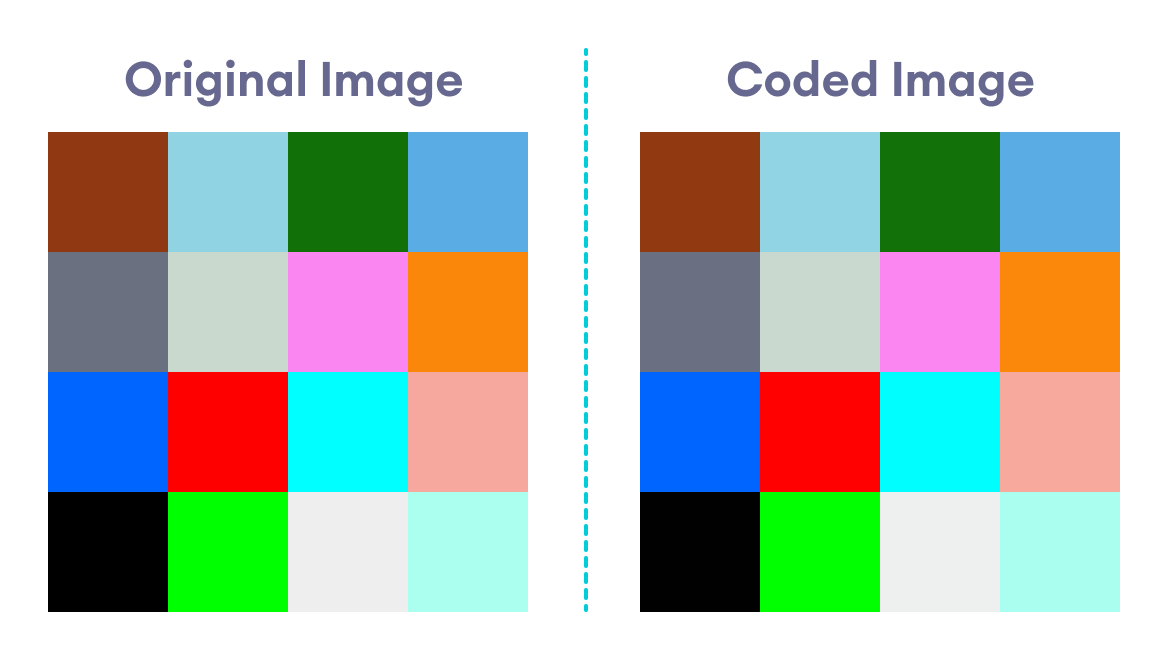
The two images look nearly identical. However, we know that they are subtly different due to the subtle modification to the RGB codes of each pixel.
The image below shows both the original image along with the RGB values of each pixel:
Step 2b: Decoding the Coded Image
In order to retrieve the message hidden in our coded image, we simply reverse the process that led to it being coded in the first place i.e.
- Retrieve the RGB code of each pixel.
- Take the binary equivalent of the red, green, and blue values of each RGB code.
- Choose the rightmost bit of the red, green, and blue binary values and combine them.
- Convert the resulting binary number into its corresponding decimal number.
The image below shows the coded image with the corresponding RGB values of each pixel: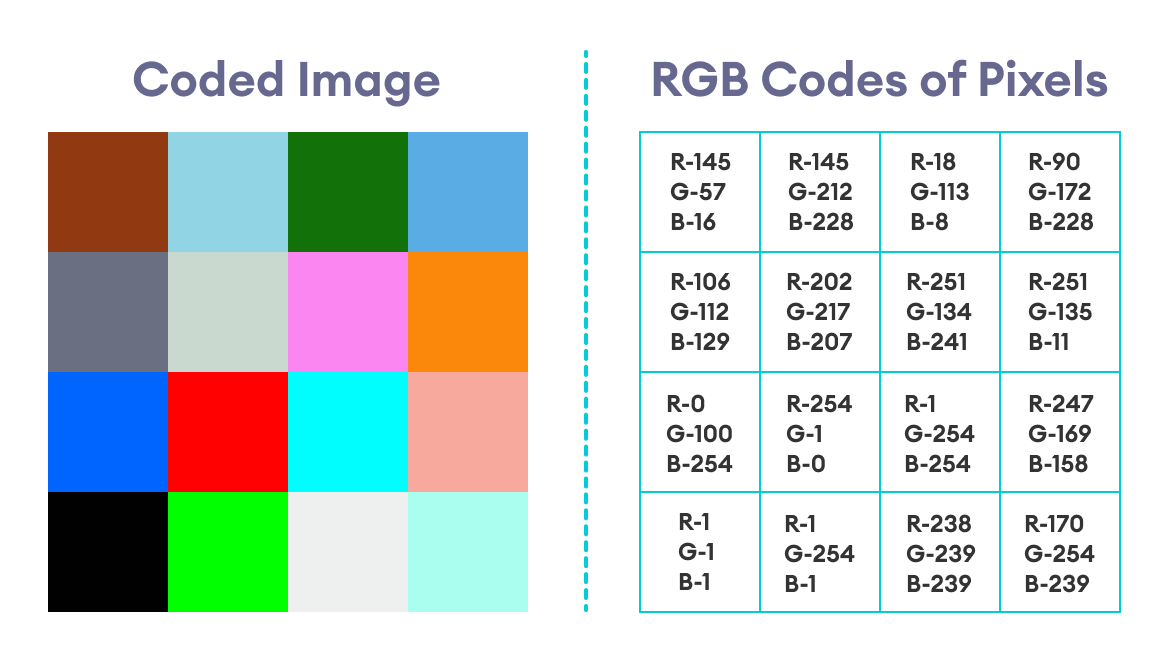
Decoding the image will give us the numbers:
6420135702467531
Note: If we examine the above image and this simple algorithm a bit closer, we can clearly see that if a component of the RGB code is an even number, then that number corresponds to the binary number 0, whereas an odd number corresponds to the binary number 1.
To clarify this point further, let us look at the RGB codes of two random pixels, say the pixels in row 1 column 3 (let us call it R1C3) and row 3 column 4 (R3C4).
For Pixel R1C3,
Red = 18 (even) ----> 0
Green = 113 (odd) ----> 1
Blue = 8 (even) ----> 0
Combining these numbers from red to blue, we get 010, which is the binary code for 2.
When we check the secret message, we find the number 2 in the same position represented by the pixel (see the secret message above or the image of the final solution below).
Similarly, for Pixel R3C4,
Red = 247 (odd) ----> 1
Green = 169 (odd) ----> 1
Blue = 158 (even) ----> 0
Combining these numbers from red to blue, we get 110, which is the binary code for 6. And that is indeed the correct solution.
This insight is important because it can greatly shorten the time spent on decoding the image, since this means we don't need to convert the RGB codes to binary. Instead, we only look at whether the number is even or odd and assign the values accordingly. Then we convert the final, decoded binary number to decimal.
So, instead of 4 total number conversions per pixel (3 decimal-to-binary for red, green, blue; and 1 binary-to-decimal for the final decoded binary message), we only need to perform 1 number conversion (decimal-to-binary) per pixel.
The secret message (along with its containing pixel) is represented by the table below:
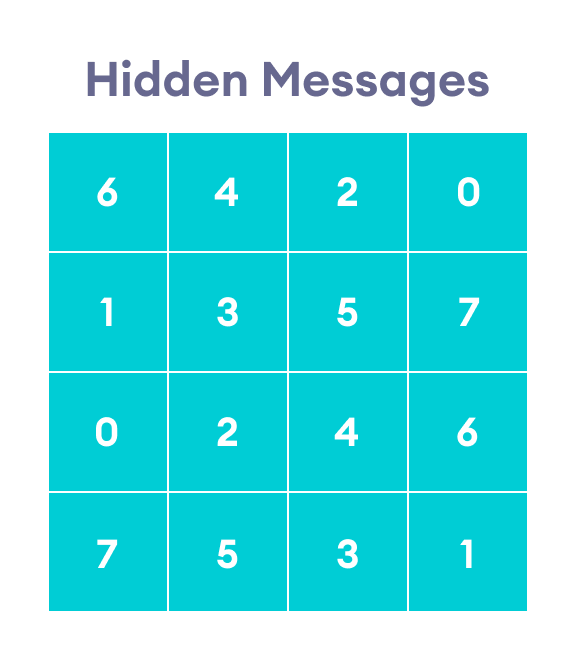
It is important to note that I have not intended for the secret numbers used here to represent any coherent message. They are merely random numbers intended to serve as an example.
However, let me stress that I have adapted this example straight out of the Coursera course (by the University of London & Goldsmiths) I credited to earlier.
The numbers can actually be secret representations of alphabets and characters if one uses the code table used by the instructor there. In our case, though, the above message is merely a random sequence of numbers.
So I highly suggest you visit and explore that online course for better insight.
Step 3a: Hiding an Image Inside Another Image
We can take our coded mischief further and actually hide an image inside another image. In this case, we manipulate the last 4 binary bits of an RGB number to hide the color code of an image.
Let us take the same initial image we took in our example for hiding messages. As before, the picture below shows the image with its corresponding RGB codes
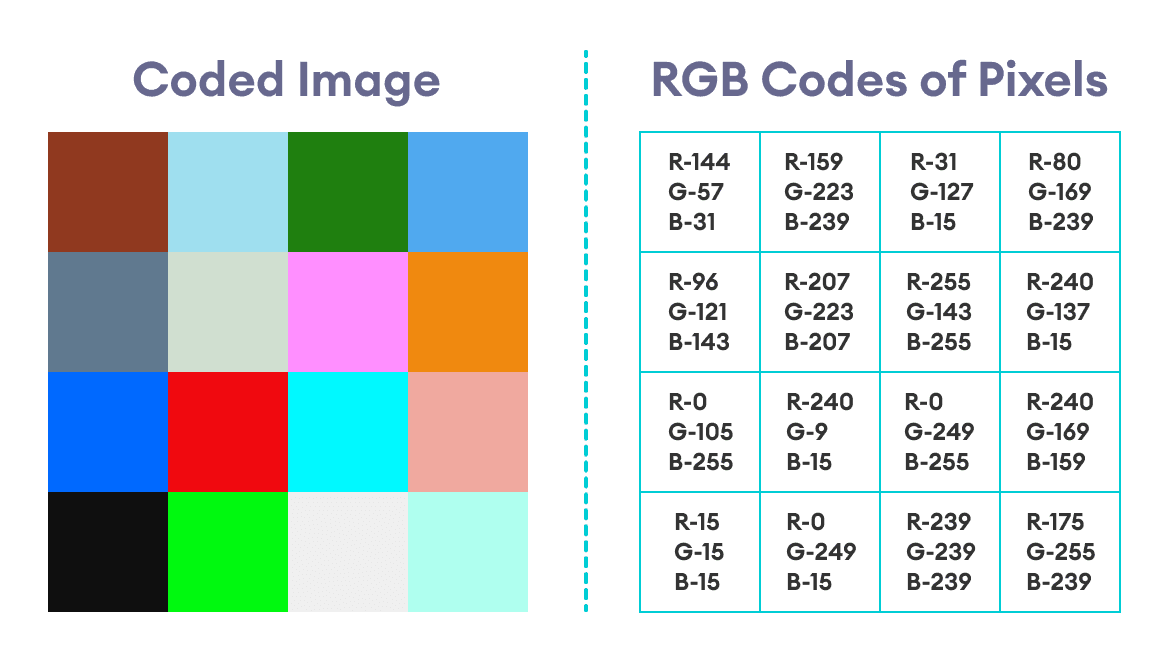
Suppose we wish to hide the image below inside the original image:
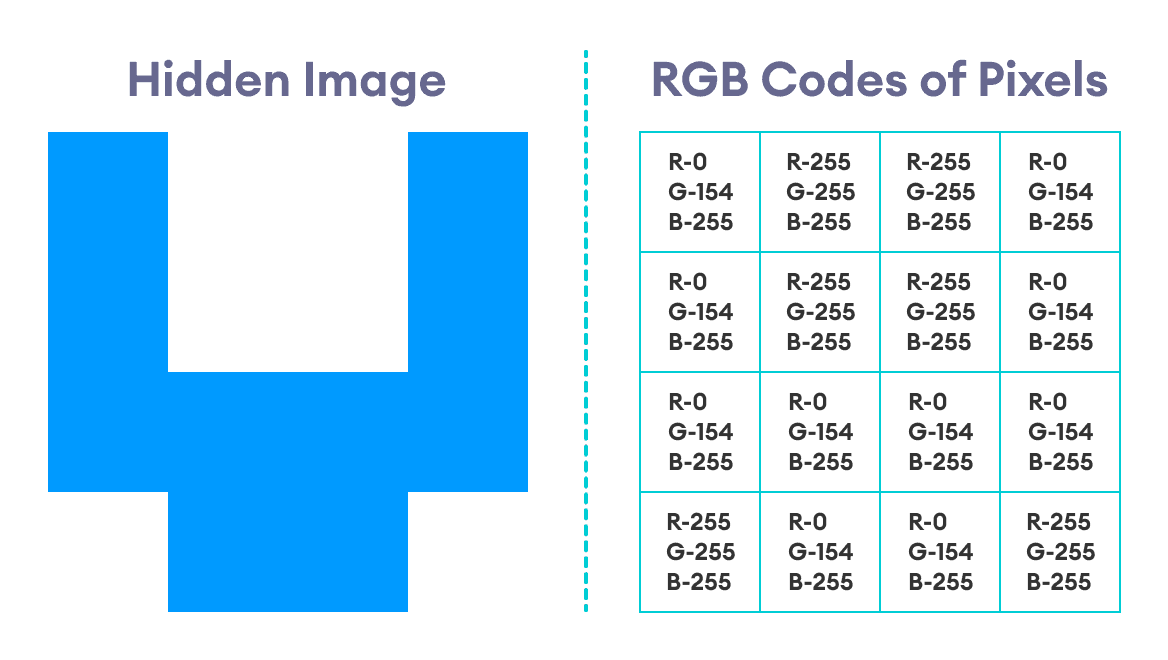
This image is a simple 4x4 image that only consists of two colors: blue and white. The RGB code for the blue color is rgb(0, 154, 255).
The code for white is, of course, rgb(255, 255, 255).
Now, let us take the first pixel of the original image and the first pixel of the hidden image.
| Color | Original Pixel | Hidden Pixel | Original Binary | Hidden Binary |
| Red | 144 | 0 | 1001 0000 | 0000 0000 |
| Green | 56 | 154 | 0011 1000 | 1001 1010 |
| Blue | 17 | 255 | 0001 0001 | 1111 1111 |
Notice the parts of the binary codes in the above table that have been made bold: we replace the last four bits of the binary code of the original pixel by the first four bits of the binary code of the hidden pixel.
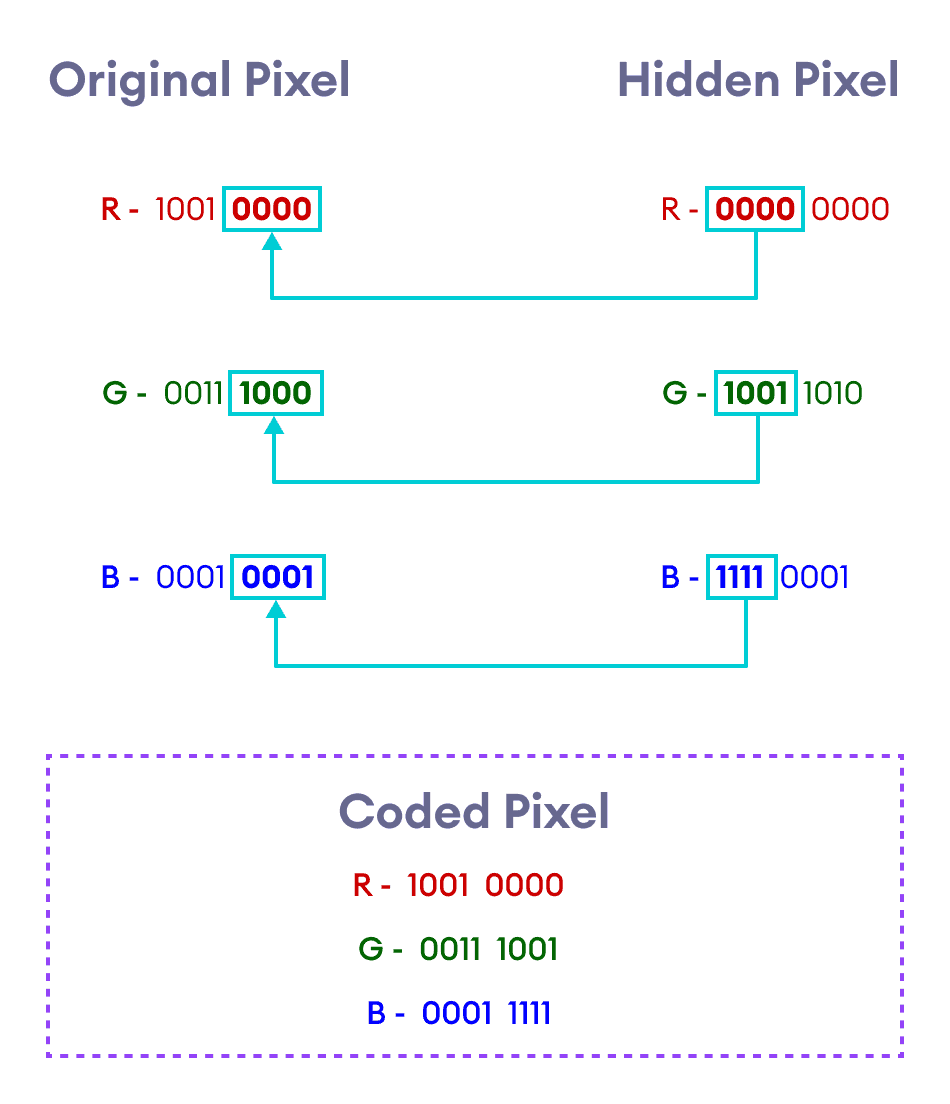
We repeat the same process for the remaining pixels. The resulting image, along with the RGB codes of each pixel, will be:
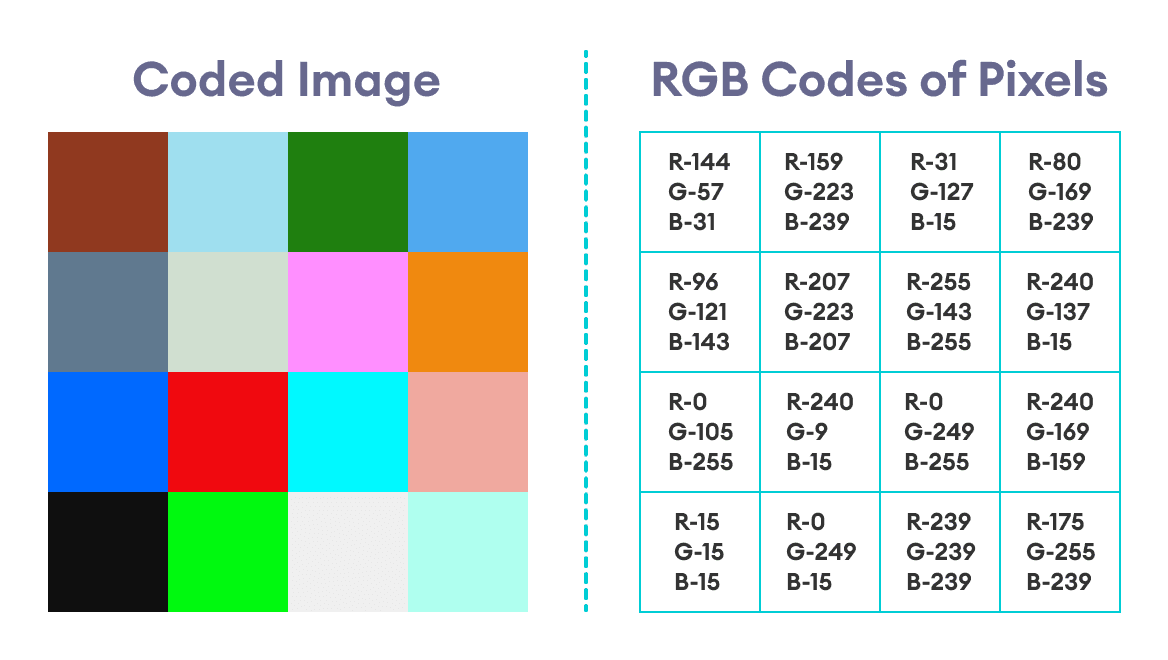
Step 3b: Retrieving the Hidden Image
We now retrieve the hidden image by reversing the process outlined in Step 3a. However, as we shall see very soon, this process is not perfect and does not retrieve the hidden image with the same exact pixel information of the original hidden image.
Steps for Image Retrieval
- Find out the RGB code of each pixel and convert them to binary.
- Take the last four bits of each of the red, green, and blue codes, and add four 0's at the right of those bits.
- This gives the red, green, and blue codes of the corresponding pixel of the hidden image.
- Repeat this process for all other pixels to retrieve the full hidden image.
This process is summarized by the graphic below.
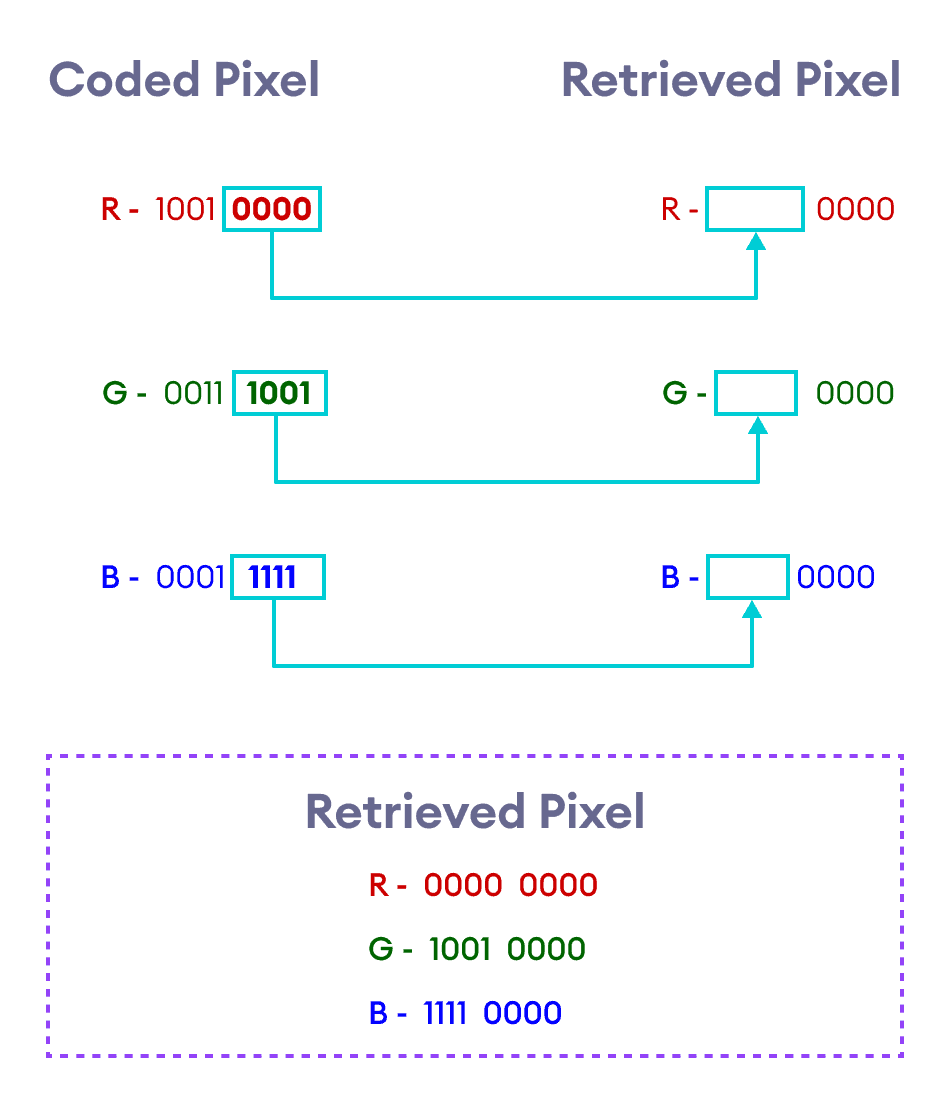
Let us take the first two pixels of the coded image and retrieve the corresponding pixels of the hidden image.
Retrieving the First Pixel
| Color | Coded Pixel | Coded Pixel Binary | Retrieved Pixel Binary | Retrieved Pixel |
| Red | 144 | 1001 0000 | 0000 0000 | 0 |
| Green | 57 | 0011 1001 | 1001 0000 | 144 |
| Blue | 31 | 0001 1111 | 1111 0000 | 240 |
Hence, the first pixel of the hidden image we've retrieved has the RGB code rgb(0, 144, 240).
Notice that the RGB code we've retrieved is not the same as the RGB code we first used to create the hidden image in its original form. The RGB code of the first pixel of the original hidden image was rgb(0, 154, 255).
However, both these color codes produce very similar shades of blue. So this algorithm might not be perfect, but it gets the job done, for the most part.
Retrieving the Second Pixel
| Color | Coded Pixel | Coded Pixel Binary | Retrieved Pixel Binary | Retrieved Pixel |
| Red | 159 | 1001 1111 | 1111 0000 | 240 |
| Green | 223 | 1101 1111 | 1111 0000 | 240 |
| Blue | 239 | 1110 1111 | 1111 0000 | 240 |
Hence, the second pixel of the hidden image we've retrieved has the RGB code rgb(240, 240, 240). Like the first pixel, this pixel is also not an exact match to the RGB code of the hidden image we had first created. The one we retrieved is a shade of gray, while the original pixel was pure white.
Once again, this shows that the process is not perfect, but it is more than enough to retrieve the hidden image in shades that are very similar to the one we originally used.
The final, retrieved hidden image - along with the RGB codes of each of its pixel - is shown below:
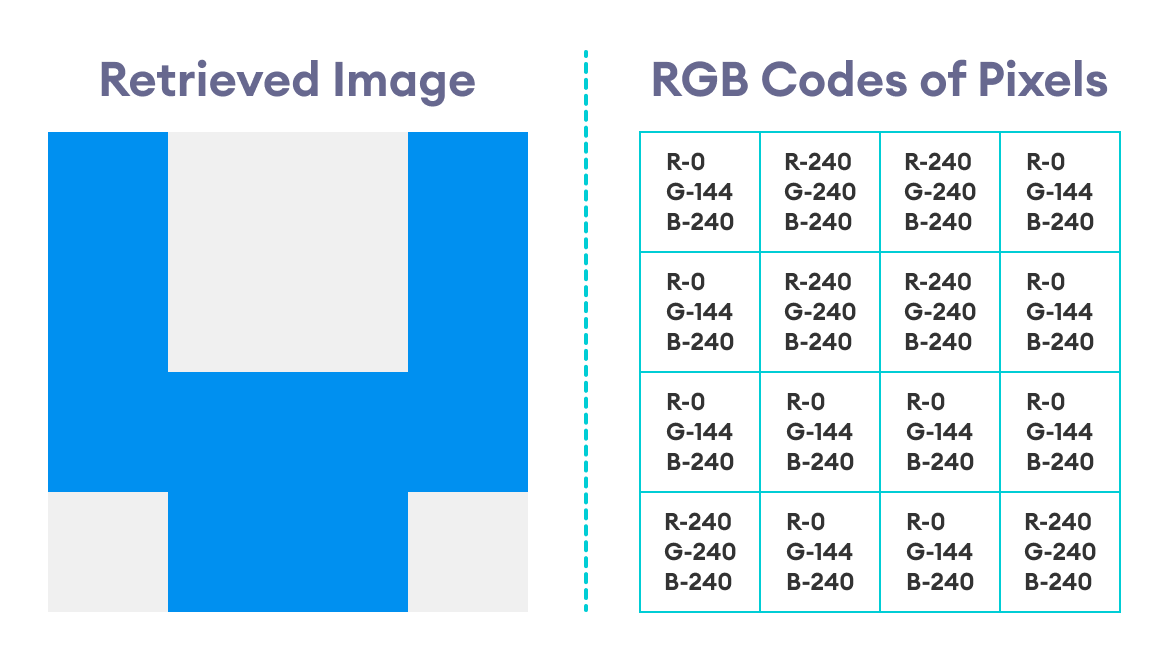
Hence, we've finally extracted the hidden image that was concealed inside another image.
Final Thoughts and Takeaways
- Pixels are the smallest units through which images and graphics are displayed in computers and other electronic devices.
- The color of a pixel is determined by a numbered code, some of which are RGB, HEX, and HSL.
- Thus, steganography requires basic knowledge of number systems such as the binary and decimal number systems (and also hexadecimal number systems, which we didn't discuss in this blog).
- We mostly use RGB codes for the particular algorithm discussed in this blog, and convert them to binary to manipulate them and hide messages.
- Only the least significant bits of the RGB codes are manipulated in this algorithm.
- Hiding an image inside another image can turn out to be a somewhat imperfect process.
- The algorithm (and approach) discussed here is specifically taken from an online Coursera course by Goldsmiths, University of London, called Mathematics for Computer Science. Please visit the course for more rigorous and in-depth content.
Subscribe to Programiz Blog!
Be the first to receive the latest tutorial from Programiz by signing up to our email subscription. Also more bonus like inside looks on the latest feature and many more.


